Thursday, January 29, 2015
WIP(again): High Tea Cuffs
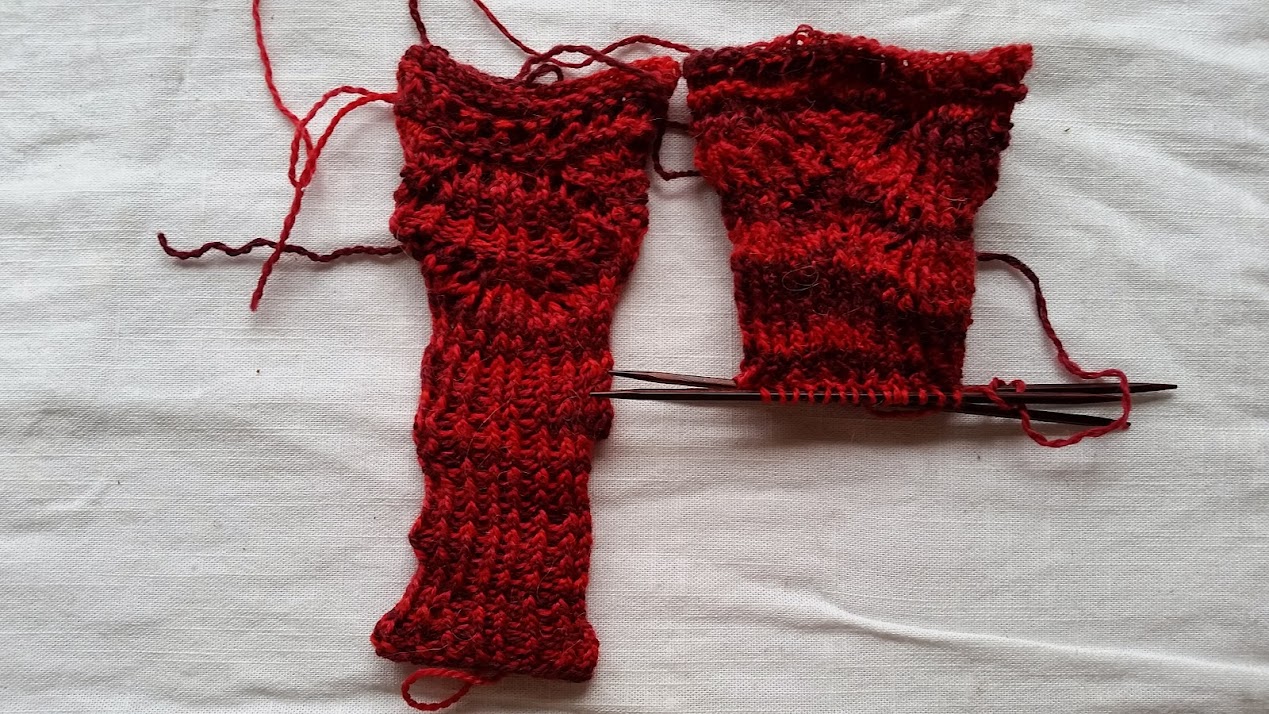
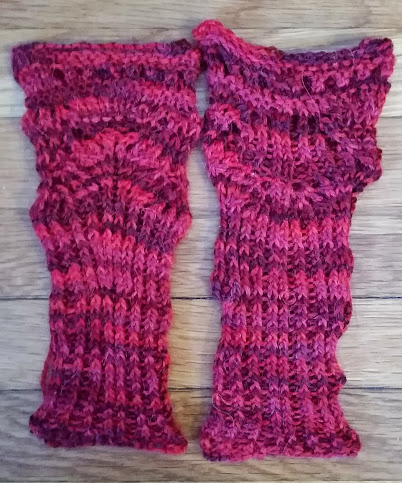
As anticipated, even after blocking the High Tea Cuffs by Andrea Jurgrau that I recently finished are FAR too small, even for my delicate little wrists, which means they 100% will not fit an adult human being, so I am re-knitting them.
I'm still using the Knit Picks Imagination Hand Painted yarn in the Ruby Slippers colourway and still using the 3.25mm DPNs, I just decided to cast on more stitches. The pattern repeat is 18 stitches and the last time I'd cast on 36. This time, I decided to cast on 54 stitches, although I worry this will make them too big this time around. My swap partner has gotten back to me with their wrist size (which is bigger than mine, but not a LOT bigger than mine), so I 'm going to just knit one of these (they go fast) and see how big it ends up. If it's more than 3cm too big for me then I'm either going to have to scrap the idea of making the matching cuffs and scarf set or I'm going to have to hope that if I knit this on a 2.75mm needle, I can just make up the difference in row gauge by adding rows to the ribbing and that it will still work out okay.
The cuff on the left is the original one I knit with 2 pattern repeats and the one on the right is the new one, just for comparison.
I'm hoping to have these done by the end of the weekend, so here's hoping you'll get a good FO post by next week. Unless it's all too large and has to be re-done yet again and then I finally decide to scrap the project.
Tuesday, January 27, 2015
Stash Confessional: Birthday money!
Hi again. I’ve got another stash confessional, though a
smaller one this time. My wonderful mother, being the amazing, thoughtful,
kind, caring person she is, bought me the perfect birthday gift of a gift card
to my LYS with the instructions that I was to “Use this to make yourself
something beautiful”. So, I took that as a license to buy some really nice yarn
that I’ve always wanted and never purchased for myself.
I initially brought it in while the LYS was having a 20% off
sale on all the things on the wall and tried to buy myself some Quince &
Co. for a sweater, but the amounts and the colours and all the factors weren’t
working out. Besides, I have one sweater quantity of Quince & Co. wound up
and ready to be a sweater whenever I get to it and one sweater quantity of
Quince & Co. on infinite backorder, so I figured maybe this was the yarn
gods telling me this wasn’t the correct use of my free $50US. I left with
nothing (proud of myself…not too often I can say that during 20% off everything
on the wall day. Nearly the whole store is stocked on the walls…at least most
of the practical yarn. It’s hard not to buy *something*), and decided that when
I came back for my regular knitting night on Thursday I would buy myself
something nice. Maybe finally buy some Madeline Tosh despite my opinions about
Madeline Tosh or some Malabrigo.
Come back I did, and although I stood staring at the
Madeline Tosh and Malabrigo wall for a good half an hour, thinking about hats
and cowls and all manner of things I could make, nothing seemed special enough.
Nothing seemed right. Then finally, I found it. A yarn store exclusive that oneof the local dyers created for a recent Shop Hop. Colourways inspired by the
local Zoological Gardens. All the teal/blue/brown variegation I always wanted
and never bought because what was I going to do with all that fingering weight
sock yarn? Only now I’m a sock knitter! So I bought it. It’s not lush. It’s not
luxurious. But it is the exact colours I love. And it is locally created and
locally inspired. And it’s called “More Otter than Sea”. All these things were
a win.
Now, of course, this didn’t take up all my money (close
though…it wasn’t inexpensive sock yarn), so I had to think of what else I could
manage to get 1 skein of and still be able to make something. The answer to
that, it turns out, was Leading Men Fiber Arts. I’ve been hearing about their
yarn (and meaning to listen to their podcast) for a while now, so I was excited
to see it in the store a few weeks ago. The colours were beautiful and vibrant
and, really, the big problem here was deciding what colour I wanted. I could
only get 1 skein of sport weight, so I figure this will turn into a hat or a small
cowl or maybe mittens, so it needed to match with my coats and still serve a
purpose. Problem is, my coats are brown or blue. And the colours I picked up
were either beautiful oranges (still regret not being able to buy that one) or
grey or dark green. So, I was forced to use the tiebreaker method and buy on
colourway name. Which means the grey won out just because they decided to name
it London Fog. Now I need to knit myself just the right thing to take me back
to a grey London day where you need the softest cowl to snuggle down into
against the damp mist that chills you to the bone and everything will be
perfect.
So…added some meters to the stash (720.5 m/ 200g), but it’s for a good
cause and I'm still grossly ahead of schedule thanks to my destash.Besides, I wouldn’t be at all surprised if one or both of these is used up
before the year is out.
Labels:
2015,
leading men fiber arts,
local,
London,
merino,
minnesota,
Minnesota Zoo,
nylon,
sock yarn,
sport weight,
stash confessional,
steven be,
wild hare fiber studios,
yarn,
yarn purchasing,
yarn stash
Sunday, January 25, 2015
FO(ish): Downton Abbey High Tea Cuffs
So, once again, it becomes clear to me that although I keep saying FO Friday, it's really more like FO Saturday or Sunday, or even Monday. We do what we can around here. Anyway, here are the High Tea Cuffs from the Unofficial Downton Abbey Knits 2013 out of Knit Picks Imagination Hand-Painted in Ruby Slippers in their more finished form.
These are only finished in the sense that they're done being knitted the first time. By which I mean these are waaaaaaay too small for my tiny little wrists so there is no way they will fit an actual human being and I'll have to reknit them. I'm unsure if I have to go up another needle size and re-knit the whole thing, or if it's just the part of the ribbing where I listened to the pattern and went down a needle size that screwed it all up. These are the perils of knitting something designed for laceweight yarn on fingering weight yarn and thinking you're good enough to figure out this math.
It doesn't help that the bind off the pattern tells me to use has absolutely no give whatsoever. I mean, right now I can't tell which one I bound off in pattern and which one I used my regular bind off on, so that's hardly the only thing I've got going on here, but it certainly isn't helping.
So...these are done and they're a quick knit and I love them and probably if you're the sort of person who knits with laceweight yarn they're even easier. The pattern is clear and easy to understand. It only gives you charted instructions for the lace pattern though, so if you're the sort of person who prefers to have things written out rather than reading them from a chart, know that you might have to create the written instructions yourself. That and the fact that I'm skeptical about the bindoff are the only issues I have with this.
You'll probably be seeing these again soon when I re-knit them. I'll let you all know if it was the full pattern that I needed to fix or just not dropping a needle size on the ribbing.
Wednesday, January 21, 2015
WIP Wednesday: High Tea Cuffs
Let me start out here by saying...these are so close to done it hurts! I can almost promise you that pending epic disasters you'll be seeing these again for FO Friday. I know I said that with the sweater and then it didn't happen, but if I can get the few internet things done that I need to do relatively quickly, I may even be able to finish knitting these tonight and get them blocking. Plus they should block much faster than a full worsted weight sweater.
I'm knitting the High Tea Cuffs (and eventually the matching Jabot) for my swap partner in the Subway Knits Downton Abbey swap (shh...don't tell!). The pattern is from the Unofficial Downton Abbey Knits 2013 and actually calls for laceweight (which I do not have and will never have), but I spent the better part of a week and a half swatching and am confident that my new adjusted gauge math works out just fine. I chose to knit them out of the Knit Picks Imagination Hand-Paints in the Ruby Slippers colourway that I had in my stash for a number of reasons. First...I thought the hand-painted nature of the yarn would add interest while still showing off the lace pattern. Second, my swap partner said they like royal colours and I figured Ruby was pretty royal! Third, it's fingering weight, which is a reasonable substitute for a laceweight. Plus the little bit of alpaca in the yarn makes them soft and gives them just a little of the halo. I really like how they're turning out and I hope my swap partner will too.
The only complaint/problem I have so far is that I did the bind-off as instructed in the pattern and it's WAY too tight. If it doesn't fix itself after blocking I'm going to rip it out and re-do the bind off with a stretchier one. I don't want it too stretchy because it should grip the wrist a little bit, but at the same time I can barely get it over my hand and I have tiny little hands/wrists so I figure that's a good sign I should make it bigger.
Stay tuned for more on Friday, I imagine.
Tuesday, January 20, 2015
Stash Confessional: Minnesota Yarns
This week’s (month’s???) stash confessional is very
different than most. Not that it doesn’t mean I didn’t acquire some stash,
because I definitely did. Just that I lost significantly more stash than I
acquired. Which, you know, is the goal. Still, it puts me decidedly ahead in
the plan to be 24,000m lighter by the end of the year. That said, I’m pretty
sure I’ll never again get rid of this much yarn at one time, so I suppose I
should preface this with a “results not typical” sort of statement.
A bit of background for anyone who might be a new reader. As
part of my “own less in 2015” goals, I made a commitment to knit or otherwise rid myself of 2000m of yarn per month. Which . . . considering a worsted weight
sweater takes ~900m of yarn is pretty lofty if I were just knitting it all, but
it includes knit AND destash. That said, I don’t have THAT MUCH yarn I’m
willing to part with as destash, and after Sunday I have even less.
Sunday. I took a birthday trip north (halfway to Canada, as
I like to phrase it) and made it a point to stop in to the LYS in town (home of Three Irish Girls) both because I had
heard good things about the store (all correct) and because I wanted to get
myself some TIG from the source, as it were. While investigating the store, I found
out they’re a drop-off location for the charity knitting group F.L.O.C.K. (For Love of Charity
Knitting). F.L.O.C.K. will basically take whatever yarn you want to give them
and distribute it to various group members who want to charity knit for
someone, which I think is great. I would love to do more charity knitting
myself, but I also like knitting things FOR myself, so I don’t get around to charity
knitting as much as I do in my dreams. I figured this was a good way to go
through my stash, figure out what I would have probably designated into charity
knitting projects once I got to it anyway, put it all in two giant plastic
bags, drive it 2.5 hours north, and drop it off for other people to play with.
All told, I dropped off 4457.65m (2580g) of yarn from my
stash. That puts me TWO MONTHS ahead on my stashdown goals, provided I don’t
actually purchase more yarn. But you know where this is going, right?
As I said, my primary goal in hitting up the LYS was to
PURCHASE yarn, and purchase yarn I did, though I’m incredibly proud of my
ability to make decisions, especially in the face of a wall of Kauni and a
front-and-centre display of ALL THE THREE IRISH GIRLS with the best colourway
names and things I had never seen before. So I came home with 5 new skeins of
yarn, all of them local to my area, some of them handspun by lovely people I
would like to meet someday so I can praise them for providing me with handspun
Border Leicester, for a total of 1453.6m (581g) of new yarn, which evens my
destash to acquisition total for this trip to 30004.5m (1999g). Not bad. I
count that a mega win! I’m still well ahead for the month of January and still
knitting away on a project and swatching for the next.
This probably won’t be the final acquisition post for the
month since my mother gave me a $50 US gift card to my LYS with the instruction
to “Knit something beautiful” for myself, so I’m betting I’ll be back again
next week with more stash confessions.
Which brings us to the moment we’ve all been waiting for. Stash
confessional #1 for the year:
1 skein of Three Irish Girls Adorn sock in the “Cooler Bythe Lake” colourway. I actually had this and a “Land of the Loon” colourway
that were SUPER similar, but Jonas and I rationalised that although both were
awesome, the blue makes this one better. Plus, “Cooler By the Lake” was the
tagline of my childhood hometown for a while in the 80’s/90;s so even though I
know this meant a different lake, I still felt like it was made just for my
home.
1 skein of Three Irish Girls Adorn sock in the “Cair Paravel”colourway. And okay . . . it’s named after the castle in Narnia. Do I need to rationalise
it beyond that?
1 skein of Three Irish Girls Glenhaven Cashmerino Worsted inthe “Observation Hill” colourway. Which is pretty. And is named after a place
in the city we were visiting (which is where TIG dye out of). But also there
was a place in the city I went to University in (my second home) called
Observatory Hill and I spent a LOT of time on that hill and I felt like this
colour could also represent that place. Plus did I mention it’s pretty?
1 skein of super awesome amazing hand spun Border Leicesteryarn in the “Natural Dark” colourway from a local spinner. It’s 225m in a
beautiful chocolate brown and I’m SO EXCITED to work with Border Leicester. No
idea what it will become, but whatever it is will almost certainly be warm and
happy and made with love from start to finish.
1 skein of super awesome amazing hand spun BLF/Silk in the “LanikaiHike” colourway (presumably inspired by Hawai’i) from a spinner that’s evenmore local to me. It’s beautiful barberpoled brown and blue (you know how much
I love brown and blue together!) and is 240m of DK weight. Again, no idea what
it will become, but it is sure to be made with love.
Note that despite a WALL OF KAUNI I did not purchase any.
This doesn’t mean I didn’t have three different colourways in my hand at one
time, it does mean that I decided that Kauni skeins have a LOT of yardage and I
still haven’t decided what the three skeins of Kauni I purchased back in May
are going to be, so I reluctantly returned them from whence they came because
although I love Denmark and Danish yarns/knitting something fierce, 2015 is all
about making good decisions with stash and I could walk away feeling
comfortable with what I purchased.
Wednesday, January 14, 2015
FO(s): Tauriel and Custom Elvhen Triangle Scarf
Well, it’s certainly not Friday, but I figure it’s time I
tell you all about the not one, but TWO objects I finished last week! A cabled
cardigan out of wool/alpaca and a triangle scarf that someone commissioned from
me on Etsy. I dyed the yarn and then knit the scarf for her costume for an
upcoming convention. Pretty proud of myself for completing a “create this yarn
and then make a thing with it” cycle AND getting paid for it on top of things!
First, the sweater! A bit before the end of 2014, I used the
Random Number Generator system and landed on the 6 skeins of Berocco UltraAlpaca in a forest green colour that I’d purchased on Small Business Saturday
in 2013 from the tiny little LYS/Fabric store/Indie artist boutique store inthe adjacent neighbourhood. So I searched Ravelry for patterns for the yarn and
ended up on a sweater in my queue, Tauriel by Bonne Marie Burns from ChicKnits. I’d heard many good words for all of Bonne Marie’s patterns and the Chic
Knits patterns, so I’d queued a bunch of them a few months ago. Fortuitous,
because I think this yarn and this pattern (and this frigid weather we’re
having) were made to be together.
The scarf is something I’ve knit before, but this one was a
bit more special since I got to also dye the yarn for it. On my Etsy page, I
offer a triangle scarf that was inspired by Merrill from the Dragon Age videogame, a character I also dye yarn inspired by. The pattern is from ALT
Designs and is called the Elvhen Triangle Scarf. I knit the one I have and the
one on Etsy out of the recommended yarn, Lion Brand Homespun, and hated every
minute of it. I’m pleased to say this experience was quite different.
Let’s break it all down.
Labels:
223People,
alt designs,
berocco ultra alpaca,
bonne marie burns,
bulky weight yarn,
cables,
cardigan,
chic knits,
dragon age,
FO,
hand-dyed yarn,
knitting,
merrill,
sweater,
worsted weight yarn
Wednesday, January 7, 2015
WIP Wednesday: Tauriel by Bonne Marie Burns
So, I'm trying to start a new feature here, we'll say if I can keep up with it.
Every Wednesday, both so I can measure my progress and keep myself accountable (though the latter is less important since I'm mainly a monogamous crafter), I plan to post a photo of my current work in progress. I figure at the very least this will make sure I post once a week and perhaps a nice end result will that I can do a bit of a "year in photos" post once we reach the end of 2015. Plus I thought it would be fun.
Here's my current WIP, Tauriel by Bonne Marie Burns from Chic Knits. I'm at least 95% positive it has nothing to do with the new character in the Hobbit movies, but I won't say I don't think this looks like it could have been inspired by her.
I'm knitting it out of Berocco Ultra Alpaca that I bought back on Small Business Saturday of 2013 because that's the yarn selected by the Random Number Generator. Not that I don't love knitting with that yarn and not that I'm not super happy about all things involving this sweater, just that I asked RNG what yarn I should use and it chose this. I bought another sweater quantity in orange to knit something for Jonas and I most certainly won't regret that decision whenever it comes around to making it. The yarn is soft and fluffy and not at all splitty and very lovely.
I actually had this pattern in my queue (though not for that long) after hearing the Knitmore Girls sing the praises of the Chic Knits patterns and then going through and queuing basically all of them, so once the yarn was selected I used the magic of the Ravelry pattern browser to match it up with a pattern in my queue and it was a match made in heaven.
The pattern is somewhat brilliantly written (especially if you hate seaming) and the cable pattern is incredibly easy to memorise. At most points (until I got to the bottom and actually had to knit ALL THE WAY AROUND the cardigan) this was pretty much flying off the needles. Right now I have about 10 rows of stockinette and then 10 rows of ribbing to knit on the second sleeve and it will be done. I started this on December 27. Now, I've had more knitting time than usual since then, but not bad for a full size sweater.
On that note, I really, really, really hope that my washed swatch didn't lie to me and that the characteristic alpaca drape and stretchiness isn't going to let me down. Otherwise I better add some length to the sleeves at the very least...they're, well, noticeably short. If they were pants people would ask me if I were expecting a flood. We shall see after blocking.
I'm betting you'll meet up with this sweater again in all it's finished and blocked glory on FO Friday. I have a mind to finish these sleeves as soon as I sign off here. Which is now.
Tuesday, January 6, 2015
Sewing: Legend of Zelda Fabric Source
Regarding the fabric used in the project bag tutorial I posted yesterday (since I got some comments on its awesomeness):
It is Legend of Zelda: A Link to the Past fabric that I ordered from Spoonflower (which is the best place in the world to find geeky fabric, though it is a bit pricey).
Exterior: Legend of Zelda: A Link to the Past Hyrule map
Interior: Legend of Zelda: A Link to the Past
It is Legend of Zelda: A Link to the Past fabric that I ordered from Spoonflower (which is the best place in the world to find geeky fabric, though it is a bit pricey).
Exterior: Legend of Zelda: A Link to the Past Hyrule map
Interior: Legend of Zelda: A Link to the Past
Monday, January 5, 2015
Sewing: Project Bag Tutorial (at long last)
Since I had to make another project bag over the weekend, I told
myself that I needed to actually post the "how I make my project bags"
tutorial that I've been meaning to post since sometime in October. It's
past time, and I hope it may be helpful to some people.
I will say that I offer multiple bag sizes, so the actual sizes/dimensions are more formulas than numbers. I hope that's fine. I can do it, so that probably means it's really easy math!
That said, let's dive in!

A note: Although I don't mention it all the time, please know that I press my seams open after every sewing step and that I trim my seam allowances down to 1/4" to make it easier to turn the bags and put them together without too much seam bulk. When trimming your seams, be especially sure not to accidentally clip any of your stitching. If you do not want to trim the seams, at the very least you will find it helpful to notch your corners to make the bags easier to turn.
Step 1: Cut the fabric. I use a different fabric for interior and exterior, so it's basically two of the exterior fabric and two of the interior fabric, not on the fold. I also cut a pocket out of the main fabric.
The bag sizes I offer are 9"x9", 12"x12", 15"x15", and 18"x18". I just really like to have square bags. You can basically use whatever dimensions you want. I use a 1/2" seam allowance all the way through, so whatever I do, I just add 1" to the finished dimensions when I cut, so...10"x10", 13"x13", 15"x15", or 19"x19".
For the pocket, I cut the main fabric to 12" x whatever the bag width dimension is. You will fold it in half to make a 5.5" tall pocket.
Step 2: Pin the outer fabric, right sides together, being sure to line up the corners.
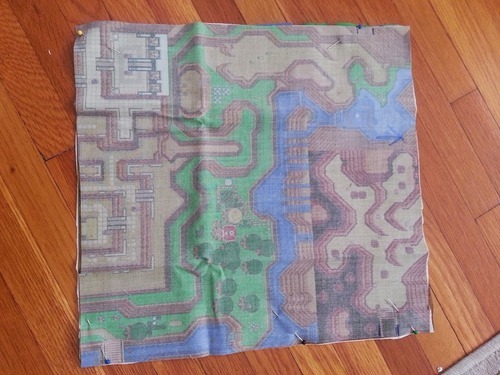
Step 3: Starting about an inch and a half down from the top of the fabric, sew around three sides of the project bag, pivoting when you get to within a half inch from each corner. Stop an inch and a half from the top of the other side of the bag. In mine, you'll see that I then left a small half inch opening and stitched the last inch to the top. I've since stopped doing it this way, as I find it means you have to rip that out when you sew the inside to the outside.
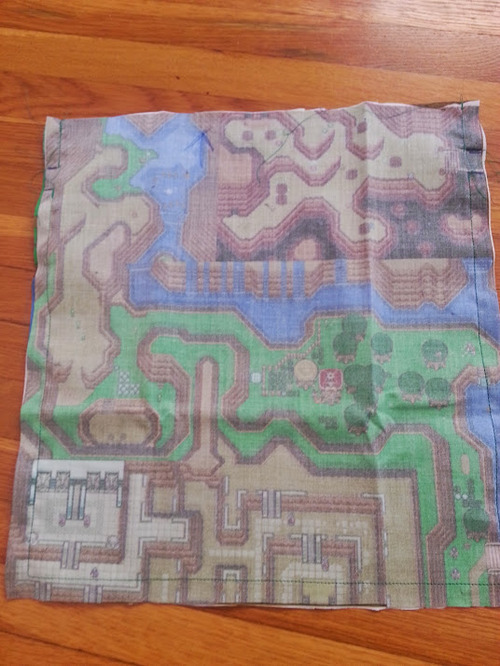
Step 4: Fold the pocket fabric in half lengthwise, putting right sides together. Make sure to keep the pattern upright if you have one. Fold along the 12" side so you end up with a 6" tall piece of fabric.
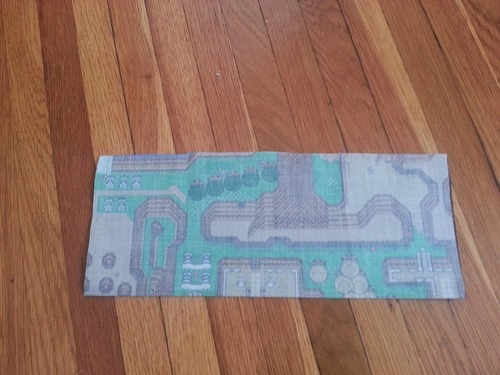
Step 5: Starting at the fold, sew around the three open sides of the fabric, pivoting a half inch from each corner. Be sure to leave a 2" opening before you reach the next fold, so you can invert the pocket to be right side out.
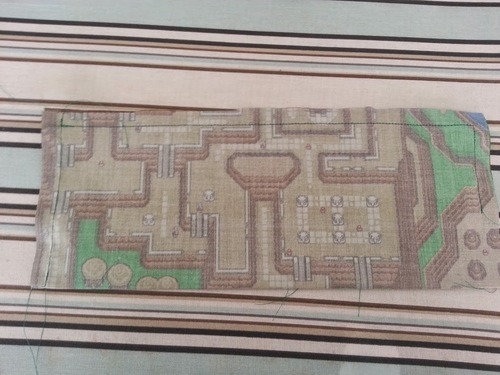
Step 6: Trim your seams to a 1/4" seam allowance, being sure not to cut the stitching. Using a tool or a wooden chopstick, pull the fabric through the opening you left until the pocket is right side out. Be sure to use your tool or your chopstick to push out the corners so that they are square. Press the pocket flat.
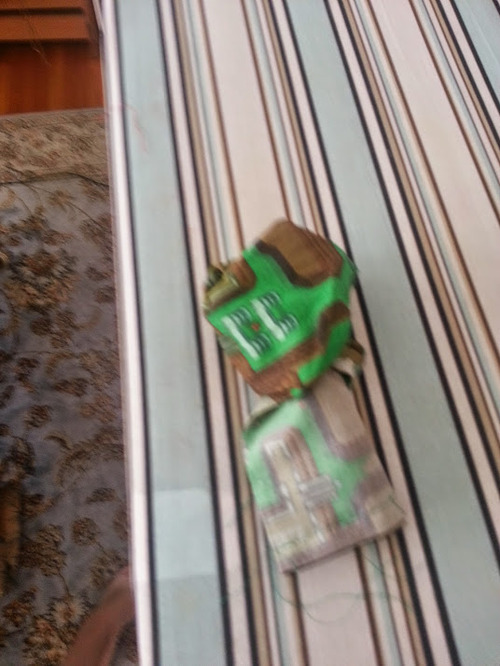
(Half turned pocket. Sorry the photo isn't the best.)
Step 7: Pin the pocket to one of the pieces of lining fabric, making sure to centre the pocket on the fabric so that the edges of the pocket fall just inside the seam allowance. Don't worry about sewing up the opening you left for turning the pocket, since it will be incorporated into the seam of the lining. I like to pin the pocket a comfortable distance up from the bottom. I eyeball it, depending on what size the bag I'm making is.
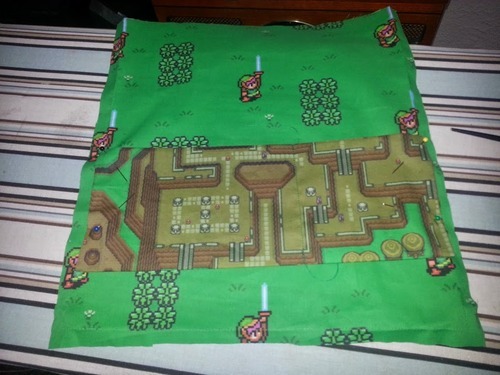
Step 8: Using a zigzag stitch and sewing along the edge of the pocket, sew around three sides, leaving an opening on the top (because it's a pocket!)
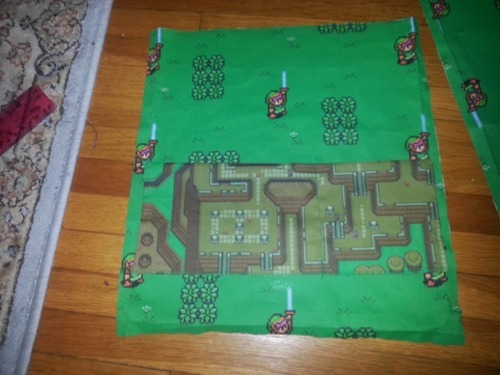
Step 9 (optional): You may want to sew a line or two down the middle of the pocket to bisect it and create several smaller pockets. Do this now, as it's basically impossible to do it later.
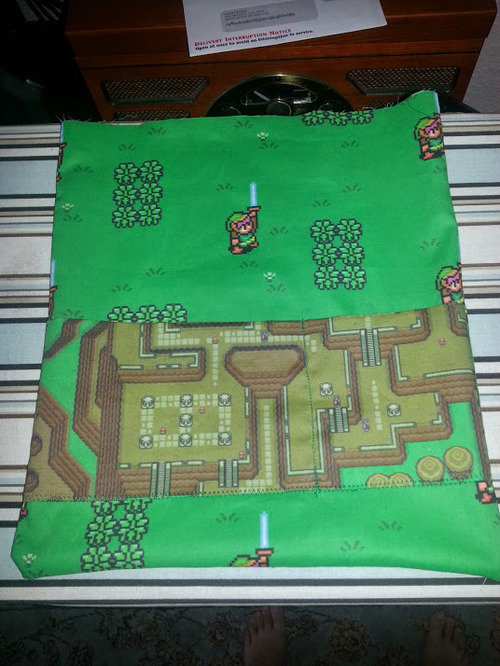
Step 10: Pin the lining pieces right sides together, making sure the pocket is in the right location and making sure the corners are square.
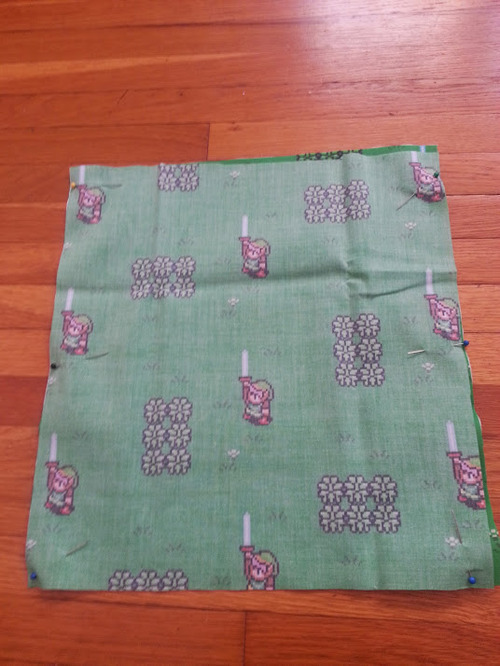
Step 11: Starting an inch and a half down from the top, sew around three sides of the bag and stop an inch and a half from the top, just as you did for the exterior of the bag, only this time, leave a 2" opening in the middle of the bottom side so you can assemble the bags easier later.
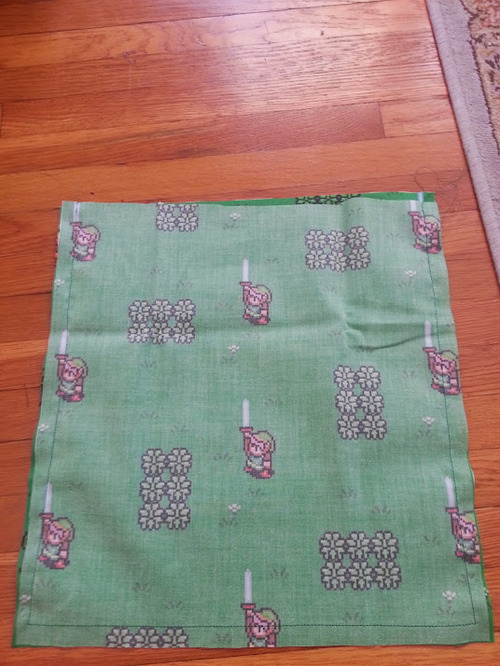
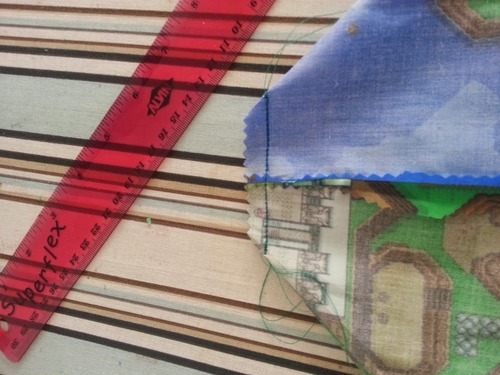
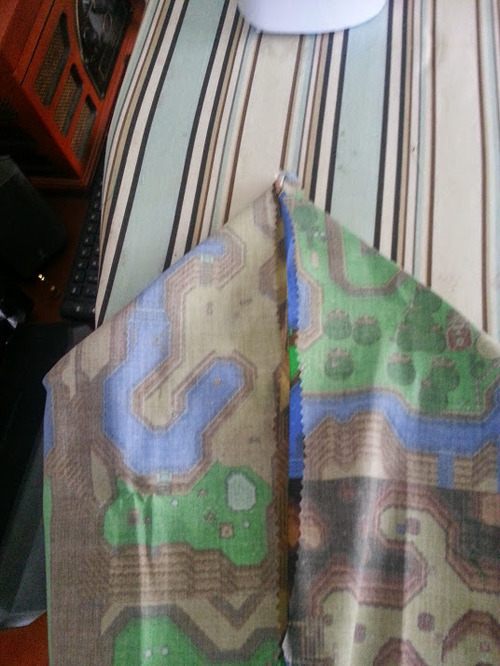
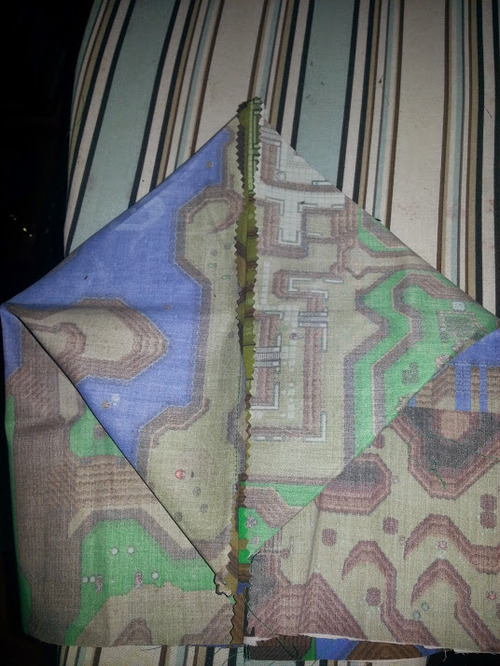
Step 12: Box the corners of both your bags (inner and outer). The process should be done as follows:
Step 13: Assemble the bag. Turn the lining bag inside out and make sure the exterior bag is right side out and then slip the exterior bag inside the lining bag. Pin the bags together around the opening. If you want to have a strap fold it in half and put it between the bags, looped end down inside the bag, with the two ends protruding slightly out of the top.
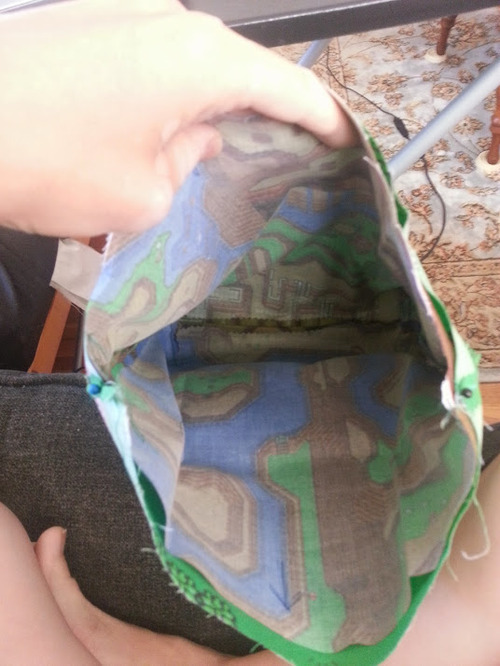
Step 14: Sew around the top edge of the bag using a 1/2” seam allowance. If you've included a strap, go over it a few times to reinforce.
Step 15: Pull the external bag through the hole you left in the bottom of the lining bag, lining up the bottom, flat corners of both bags. Sew up the seam in the bottom of the lining as best you can, then. Iron the bag flat.
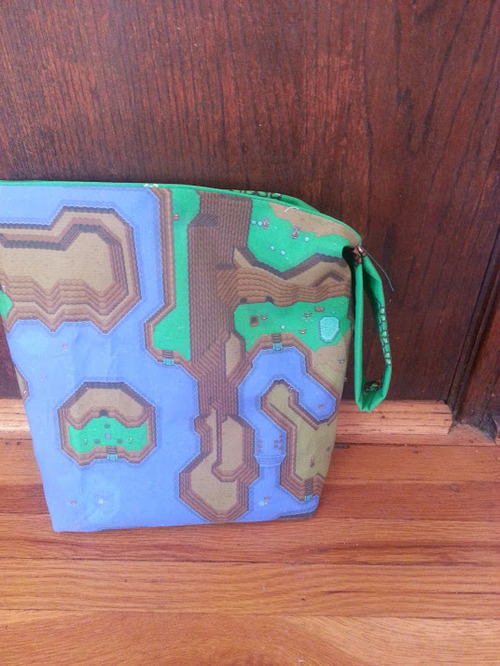
Step 16: Sew a line of stitching all the way around the bag above the opening for the cord (about an inch down from the top), and then sew another line of stitching parallel to this just below the opening for the cord (about an inch and a half from the top) to create a channel for the cord to live in. Thread the cord into the channel by attaching it to a safety pin and running it in between the lining and the exterior fabric. Thread a toggle onto the cord and tie off the ends. I also like to put a snap in the centre to allow for threading yarn through the bag without needing the bag to be fully opened.
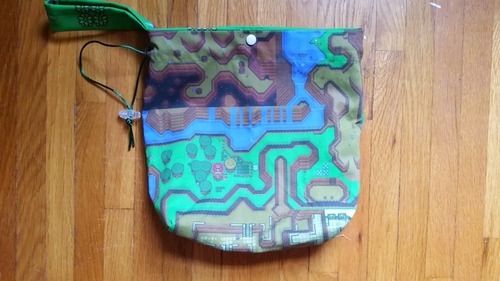
Congratulations! Your reversible draw-string project bag with pockets is complete!
I will say that I offer multiple bag sizes, so the actual sizes/dimensions are more formulas than numbers. I hope that's fine. I can do it, so that probably means it's really easy math!
That said, let's dive in!

A note: Although I don't mention it all the time, please know that I press my seams open after every sewing step and that I trim my seam allowances down to 1/4" to make it easier to turn the bags and put them together without too much seam bulk. When trimming your seams, be especially sure not to accidentally clip any of your stitching. If you do not want to trim the seams, at the very least you will find it helpful to notch your corners to make the bags easier to turn.
Step 1: Cut the fabric. I use a different fabric for interior and exterior, so it's basically two of the exterior fabric and two of the interior fabric, not on the fold. I also cut a pocket out of the main fabric.
The bag sizes I offer are 9"x9", 12"x12", 15"x15", and 18"x18". I just really like to have square bags. You can basically use whatever dimensions you want. I use a 1/2" seam allowance all the way through, so whatever I do, I just add 1" to the finished dimensions when I cut, so...10"x10", 13"x13", 15"x15", or 19"x19".
For the pocket, I cut the main fabric to 12" x whatever the bag width dimension is. You will fold it in half to make a 5.5" tall pocket.
Step 2: Pin the outer fabric, right sides together, being sure to line up the corners.

Step 3: Starting about an inch and a half down from the top of the fabric, sew around three sides of the project bag, pivoting when you get to within a half inch from each corner. Stop an inch and a half from the top of the other side of the bag. In mine, you'll see that I then left a small half inch opening and stitched the last inch to the top. I've since stopped doing it this way, as I find it means you have to rip that out when you sew the inside to the outside.

Step 4: Fold the pocket fabric in half lengthwise, putting right sides together. Make sure to keep the pattern upright if you have one. Fold along the 12" side so you end up with a 6" tall piece of fabric.

Step 5: Starting at the fold, sew around the three open sides of the fabric, pivoting a half inch from each corner. Be sure to leave a 2" opening before you reach the next fold, so you can invert the pocket to be right side out.

Step 6: Trim your seams to a 1/4" seam allowance, being sure not to cut the stitching. Using a tool or a wooden chopstick, pull the fabric through the opening you left until the pocket is right side out. Be sure to use your tool or your chopstick to push out the corners so that they are square. Press the pocket flat.
(Half turned pocket. Sorry the photo isn't the best.)

Step 7: Pin the pocket to one of the pieces of lining fabric, making sure to centre the pocket on the fabric so that the edges of the pocket fall just inside the seam allowance. Don't worry about sewing up the opening you left for turning the pocket, since it will be incorporated into the seam of the lining. I like to pin the pocket a comfortable distance up from the bottom. I eyeball it, depending on what size the bag I'm making is.

Step 8: Using a zigzag stitch and sewing along the edge of the pocket, sew around three sides, leaving an opening on the top (because it's a pocket!)

Step 9 (optional): You may want to sew a line or two down the middle of the pocket to bisect it and create several smaller pockets. Do this now, as it's basically impossible to do it later.

Step 10: Pin the lining pieces right sides together, making sure the pocket is in the right location and making sure the corners are square.

Step 11: Starting an inch and a half down from the top, sew around three sides of the bag and stop an inch and a half from the top, just as you did for the exterior of the bag, only this time, leave a 2" opening in the middle of the bottom side so you can assemble the bags easier later.

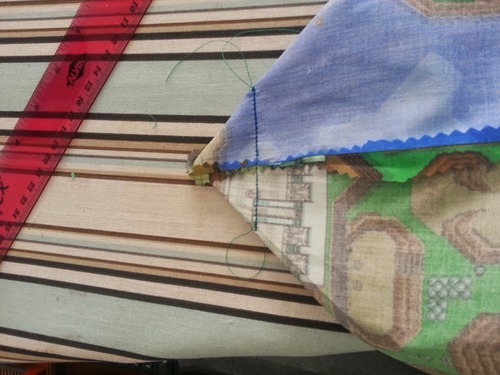
Step 12: Box the corners of both your bags (inner and outer). The process should be done as follows:
- For each of the four bottom corners on your two bags, fold the corner
with the side and bottom seam touching to create a point and iron it
flat.
- Measure 1.5” from the point and draw a straight line. Stitch across
this line and then cut the fabric ¼” away from the stitch line. Seal the
edge with a zig-zag stitch or trim with a pinking shears.
Step 13: Assemble the bag. Turn the lining bag inside out and make sure the exterior bag is right side out and then slip the exterior bag inside the lining bag. Pin the bags together around the opening. If you want to have a strap fold it in half and put it between the bags, looped end down inside the bag, with the two ends protruding slightly out of the top.

Step 14: Sew around the top edge of the bag using a 1/2” seam allowance. If you've included a strap, go over it a few times to reinforce.
Step 15: Pull the external bag through the hole you left in the bottom of the lining bag, lining up the bottom, flat corners of both bags. Sew up the seam in the bottom of the lining as best you can, then. Iron the bag flat.

Step 16: Sew a line of stitching all the way around the bag above the opening for the cord (about an inch down from the top), and then sew another line of stitching parallel to this just below the opening for the cord (about an inch and a half from the top) to create a channel for the cord to live in. Thread the cord into the channel by attaching it to a safety pin and running it in between the lining and the exterior fabric. Thread a toggle onto the cord and tie off the ends. I also like to put a snap in the centre to allow for threading yarn through the bag without needing the bag to be fully opened.

Congratulations! Your reversible draw-string project bag with pockets is complete!
Thursday, January 1, 2015
New Year: A Look Backward and A Plan for the Future
Hi there. First of all, wherever you are in the world, happy 2015. I wish you and yours a safe, happy, healthy year.
Now...down to business. First, a little look back at 2104.
I know I've been pretty bad about blogging regularly, and there were a lot of things I wanted to share with you that I simply didn't make the time for. I hope to get better at that in the future (see the plan for the future section), but for now, let's do a little recap of the year and then talk about what I have planned for crafting and blogging in 2015.
Subscribe to:
Posts (Atom)
